blog
3D printing with the Monoprice Select Mini v2: first impressions and prints: a saddle, knob, guard, guide, spinner; a cube and clip; squeezer, holder, dish; case, stand, fingers, and carousel
by snm, January 22nd, 2018
- 3D printing with the Monoprice Select Mini v2: first impressions and prints: a saddle, knob, guard, guide, spinner; a cube and clip; squeezer, holder, dish; case, stand, fingers, and carousel
Monoprice Select Mini v2

Why the Monoprice Select Mini v2? Many opinions on /r/3Dprinting and other forums recommend it as a great first printer. Watched the following reviews, a good balance of the pros and cons of this printer:
- Now, Everyone Can Afford 3D Printing (Monoprice Select Mini Review), by Mike and Lauren
- Monoprice Select Mini V2 Unboxing & Review: PLA, SemiFlex, Cheetah, Tech-G, by Lindy Design Lab
-
[Best Beginner 3d Printer 2017 Monoprice Select Mini, by ModBot](https://www.youtube.com/watch?v=Aoss9SKhOAM)
Not perfect, but it has a lot going for it, including coming preassembled out-of-the-box. You can build one yourself or from a kit for cheaper but this adds more variables on what can go wrong. Or you can pay more for a larger bed but 120x120x120 mm^3 is enough for plenty of useful objects. Also has an active community:
What is the electronics hardware behind it? Hackaday: Reverse-engineering the Monoprice printer links to Robin Reiter’s Electronics Reverse Engineering Walkthrough - Hacking the Monoprice Select Mini 3D Printer, which reveals it is powered by two familiar microprocessors: the STM32F103C8T6 (well-aquainted with, see my STM32 Blue Pill ARM development board first look: from Arduino to bare metal programming post, among others) for driving the motors/heaters, and the ESP8266 (a predecessor to the ESP32, which I also covered in ESP32-based wireless ticker display for Minecraft server activity: pushing up against the fourth wall), for the Wi-Fi and display interface. Robin Reiter was able to backup the firmware with esp_tool, then flash his own to control the LCD. Lots of interesting possibilities for hacking here. But for now I’m using the stock firmware, as it is most complete.
Setup
Followed the instructions in the User’s Manual to configure the printer, fairly straightforward: slide in the spool rack, level the bed with a piece of paper, etc. But I did have some difficulty getting the filament extruding successfully. You pull back the spring then push it through until it hits the hot end. Then heat up the hot end to the recommended temperature, about 200 degrees. Tell it to move the filament, extrude it outwards. The motor tried to push, but nothing came out of the end. I tried pushing too, to no avail. Removed the filament, put it back, tried higher temperatures, cutting a sharper edge, nothing.
Finally, I moved the printer head so the PTFE tube to it was nearly level, instead of at an awkward angle. Then forcefully pushed the filament through, an audible SNAP occurred, and it began extruding! The filament melting at last:

Not sure if there was a seal or something over the hot end but this is all water under the bridge now. Ready to do the first print.
Test print: a cat
Monoprice includes a micro SD card with a sample model, cat.gcode. Start printing it, then observe the first layer. To my untrained eye, it appears acceptable, the printer bed not to close nor too far. Left it continue printing. The layer of the cat slowly builds up, awesome. You can see it come together:

Takes quite a long time, at 1.0x speed, but this isn’t the fastest printer. For the first print I watched it intently, but for future prints once the printer is known to be working well, it should be able to be left on its own. As for the sound, you can hear it making noise, sounds like, well, a printer. Patience is required. We’re talking hours. Clocked in at 2 hours 52 minutes according to the display:

After I heard the squeaking die down, checked on it and the freshly printed cat was complete, waving up at me:

Required some amount of force to remove the print from the printing bed. The included squeegee was barely useful, instead, I tried to grab it from the top and carefully apply force, but the printer head kept getting in the way, clearly I have a lot to learn, and/or better tools to acquire. But eventually I was able to get it off:

The object is printed on a “raft”, which is meant to be removed. Broke it mostly off:

How much filament was used? Almost all of the included sample. Supposedly v1 came with not enough filament for anything, but I can confirm v2 has plenty to print the sample cat. Measured about 63 inches remaining (46 inches plus about 15 inches I cut off while trying to extrude the filament). Would be cool if the printer measured the amount of filament extruded per print so you could calculate the cost, but I guess you’re on your own here. Anyways, time to move onto a real print, with a real spool of filament.
Filament
You need to also buy filament, I picked this one:
What filament? The Monoprice Select Mini comes with a small amount of sample filament, but not enough for most anything. It takes a 1.75 mm diameter filament, and officially supports either PLA (polylactic acid, a biodegradable thermoplastic), or ABS (acrylonitrile butadiene styrene, commonly injection molded). So should I start with PLA or ABS? Maker’s Muse says Should you 3D Print in ABS? Probably not. so I went with PLA. There are more exotic materials but PLA is supposedly the easiest to work with and most forgiving.
There are plenty of filament manufacturers, too many to choose from, so I semi-randomly settled on AIO Robotics. A nice feature of their spools is they are half a kilogram, instead of the usual kilogram, and sealed in a reusable bag, so they can be stored longer and you can buy more of different colors instead of getting stuck with more than you need. Seems like a reasonably good selection, but if there’s one thing you can go wild in trying all the possibilities with in 3D printing, it is the filament. After purchasing it arrived quickly a day later after the printer, in a box with this label:

PLA Filament Diamter (“diameter”): 1.75 mm ± 0.02 mm, ROHS approved, printing temperature: 195ºC-230ºC, color: white. Rip open the vacuumed-sealed packaging, cut the end off the filament, thread through the extruder, extrude. Filament comes out. Very white, much whiter than the Monoprice sample filament which is “clear/natural”, uncolored. Finished in 2 hours 52 minutes, exactly the same as with the sample filament, no surprise since it was the same G-code. Looks much nicer, the natural/clear sample filament on the left, and AIO Robotics white on the right (with the raft):

Slicing to G-code
Thingiverse has tons of objects to download, but how to get the models to the printer? Could sneakernet it through the micro SD card, but then we need a micro SD card reader, and sufficient dexterity to unplug the SD card and replug it, meh. Or USB, but my printer is nowhere near my compupter. Wireless is the solution. The Monoprice Select Mini supports Wi-Fi, followed the instructions in the manual to associate to my network, then accessed its web interface through an ordinary web browser. An simple and uncluttered web interface:

The printer wants G-code, yet the downloaded files from Thingiverse are .stl, stereolithography. You need to “slice” the model into layers for the 3D printer. There are others, but Ultimaker Cura is one such slicer. Downloaded and installed, but my printer wasn’t listed in Add Printer, the closest was Malyan M180, but the MP Select Mini is a rebadged Malyan M200. There is a profile on the MP Select Wiki, here: https://www.mpselectmini.com/slicers/cura, except it is for Cura 3.0.4 not Cura 3.1. Fine, download the old 3.0.4 version they linked, install the profile, then Monoprice Select Mini can be selected in the Other list. Accept all the defaults. Now the .stl file (vhtoolholder.stl) can be dragged to Cura, and the model shows up.
The model designer recommends “Print this at a small layer height of around 0.1mm”, but Cura’s layer height selection has jumbled overlapping text I can’t read:

so instead of using the slider, choose Custom and enter 0.1 mm in the Layer Height text box. Cura calculates the time, length and mass of the material to be used. Click Save to File, this creates the .gcode file, then drag a drop this 2.5 MB file to the printer’s web interface. The printer display shows “Downloading…” and the web interface shows a progress bar, surprisingly slow to upload. It appears to write a new file to the SD card, cache.gc. Selected it under the Print menu on the device. The printer began printing…
…then disaster struck. The nozzle hit the bed and tore across it:

I guess you need to recalibrate the bed level after each print… it was perfect before the cat. Now it is way off, carefully relevel using a sheet of paper, then print. But it failed again, in a different manner: the strings of filament would be wiped away as the bed moved, not sticking. No raft. Cura has a “Build Plate Adhension” option, check it, and the Advanced Settings lets you choose from a skirt, brim, raft, or none. 3D printing isn’t yet to the point of “point and click”, may require fiddling, it appears.
The sample cat.gcode on the SD card lays down a nice even raft, but when I use Cura to create G-code, it lays down too thin and the plastic becomes stringy and doesn’t adhere. There is undoubtedly some settings that ought to be tweaked to fix this. But coupled with the overlapping unreadable Layer Height text in Cura, this pushed me to try another slicer: Slic3r. Downloaded and launched Slic3r version 1.2.9 stable, but it hung on the configuration assistant screen. Force-quit and relaunch, no hang this time. MP Select Wiki has a configuration bundle here: https://mpselectmini.com/slicers/slic3r, but no instructions to install. Guessing, I replaced the contents of ~/Library/Application\ Support/Slic3r/slic3r.ini with slic3r_config_bundle_mp_select_mini.ini and relaunched. Slic3r notified me:
Bed Shape Hello! In this version a new Bed Shape option was added. If the bed coordinates in the plater preview screen look wrong, go to Print Settings and click the “Set” button next to “Bed Shape”.
the rectangular bed looks fine, though. Slic3r > Filament Settings > Filament > Diameter defaulted to 3 mm, that’s wrong, this printer and filament is 1.75 mm. Changed that and set the extruder temperature to 200 celsius and bed to 50. Generated the G-code, uploaded, printed, but still, too stringy. And the sample cat.gcode is perfect.
Taking a step back, what if we try to recreate the cat.gcode from an .stl? To confirm our settings are correct, and reconcile any differences. Searching for cat on Thingiverse finds this design, looks just like it:
- maneki-neko -money cat- by bs3, published Jul 13, 2015
Another supported slicer is Repetier-Host. Repetier actually includes a bundled version of Slic3r. Loaded the money_cat.stl, sliced, but there was no raft unlike cat.gcode on the included SD card. The first layer is very important.
Groguards Creations published My Cura setup for the Monoprice Maker Select V2. Change the print speed to 40 mm/s (from 50 mm/s). Shell wall thickness is a multiple of the nozzle size 0.40 mm, use three walls, 0.4 mm * 3 = 1.2 mm. Make these changes.
For the money cat, Cura estimates a 3 hour 2 minute print time, 6.31 m / ~19 g filament. Try with the same Build Adhension Type as the sample, a raft:

Generate the G-code (this one is big, 8.4 MB) and upload. Took too long (why is Wi-Fi so slow? SD card is nearly instanteous) and I’m sick of cats, would like to try a real object soon. But my slicing settings seem to be good, the object is larger but now the extruded filament it lays down is thicker, although I didn’t let the print complete, it stuck like a champ. Keep these settings! Now for real prints, no more cats.
Try a different object, slice it. But it failed, repeatedly, the location of the failure gives some insight to the cause of the failure:

relevel the bed especially on the rear left-hand corner. Leveling is a drag, but this budget printer lacks auto-leveling. After releveling manually, the print adheres in this corner:

This print was successful, but I had more problems with printing in that area, another print first layer:

This looked really bad, but the object actually turned out fine, luckily enough. Nonetheless, definitely something to fix.
Nearly ready to print a real object. But first, a final note about this filament. At the $11.99/0.5 kg price I got for the half spool, along with the estimated grams from Cura, we can estimate the cost of the filament for a print. I’ll be estimating cost and providing these stats for each print to give an idea of how cost effective 3D printing is, using this filament at $0.02398/g. Of course, it is only an estimate, and I’m not measuring the actual length or mass extruded. Your mileage may vary.
This is where I started printing, skip to #Printing printer parts if you want to see the prints, or keep reading in this section for other printer enhancements.
Printing printer parts
After trying the first print, there are some clear areas of improvement that can be made to this printer. What better first things to print than improvements to the printer itself?
Tool rack
| Model | Tool Saddle for MP Select Mini by ArmArakel, published Oct 10, 2016 |
|---|---|
| Estimated print time | 2:11 (0:38 + 1:33) |
| Actual print time | 2:12 (0:42 + 1:30), 1 minute slower (1%) |
| Estimated filament length | 3.90m (1.14m + 2.76m) |
| Estimated filament mass | 11g (3g + 8g) |
| Filament used | AIO Robotics AIOWHITE PLA, $11.99/500 g |
| Estimated cost | $0.26 |
Simple, yet functional. A handy object to hold various tools from the printer. There is a large selection of these objects on the MP Select Mini wiki: MPSM - Tool Holders.
How about this simpler “tool saddle”, which screws onto the top of the printer.
It holds the SD card box, hex key, and a standard SD card or adapter, components used with this printer, so you can store them here instead of getting lost elsewhere. Also considered the MP Select Mini Starter’s Tool Holder by stijnvanderheyden, published Nov 3, 2017, but it is meant to attach to the printer with double-sided tape, which I don’t have. With a brim, for the tool saddle hanger.stl, Cura calculates only a 38 minute print time, 1.14 meters / ~3 grams. Estimating from the cost of the $11.99/0.5 kg spool, this comes to $0.07194 of filament. Not bad, 7¢ for this small part.
Slice it, only 0.8 MB G-Code file, upload to the printer. Print. With this one, unlike the cat, the bed leveling on the corners proved much more crucial. The (disposible) brim kind of messed up, but the part came out alright:
Next is the holder, use the second file sdcardholderholderPrototype2.STL since it includes an extra slot for a full-sized SD card (or SD-to-microSD adapter, sold separately). 1:33, 2.54m, ~7g. Cura imports it facing up:

but I imagine it will be easier to print lying down flat. Rotate 90 degrees, then it takes 1:23, 2.76m, ~8g.

I possibly could have printed both models the same time, rearranging on the print area bed. But I printed them separately, separation of concerns. The holder finished in 1:30. Both parts total, estimated cost 26¢. The holder finished printing with an ugly brim:

The backs of these parts are not smooth:

a good reason to switch to a glass bed, alas, don’t have one of those yet. The top side looks better:

Snap the two pieces together, fits snugly. Push the hex wrench into the sheath on the side, it also fits snugly. Then I pushed in my Kingston microSD-to-SD adapter, but it fit too tightly, had to use a screwdriver to pry it out; not going to push it in this far anymore. The included micro SD card case fit in alright. The screw holes were too small, and had some junk inside them, so I drilled them out with a 7/64 bit and they screwed in easily. Here is where the holder is meant to screw in, these two screws on the back of the printer:

Screwed in with the hex key, microSD card, and SD-to-microSD adapter:

I like it, now the tools are tucked away yet readily available on the printer when I need them, already proving useful. Here is another shot:

Knob
| Model | MPSM Spinner Knob by VA3TNE, published Apr 12, 2017 |
|---|---|
| Estimated print time | 1:05 |
| Actual print time | 1:15, 10 minutes slower (15%) |
| Estimated filament length | 2.01m |
| Estimated filament mass | 5g |
| Filament used | AIO Robotics AIOWHITE PLA, $11.99/500 g |
| Estimated cost | $0.12 |
The dial knob on the rotary encoder is slippy, worthy of replacement. Thingiverse collection MPSM - Dial / Knob, many to choose from, picked one that looked cool, the designer describes as having “a Low Profile, and a nice Knurled circumference, AND a deep dimple”. Loaded it into Cura, this time I moved it to the right of the bed to see if it prints better there in my printer (since the left side is damaged or unlevel or warped), and added a brim:

First layer, a pretty good circle:

This smaller part felt like it printed faster. Progress:

Done:

The designer recommended 30% infill, but I neglected to change it from 0%. Nonetheless, it seems to be sturdy. Here is the stock factory knob we’ll be replacing:

Pop it off (pull forcefully, I used pliers to get a better grip, but some people suggest dental floss):

Push on the new knob:
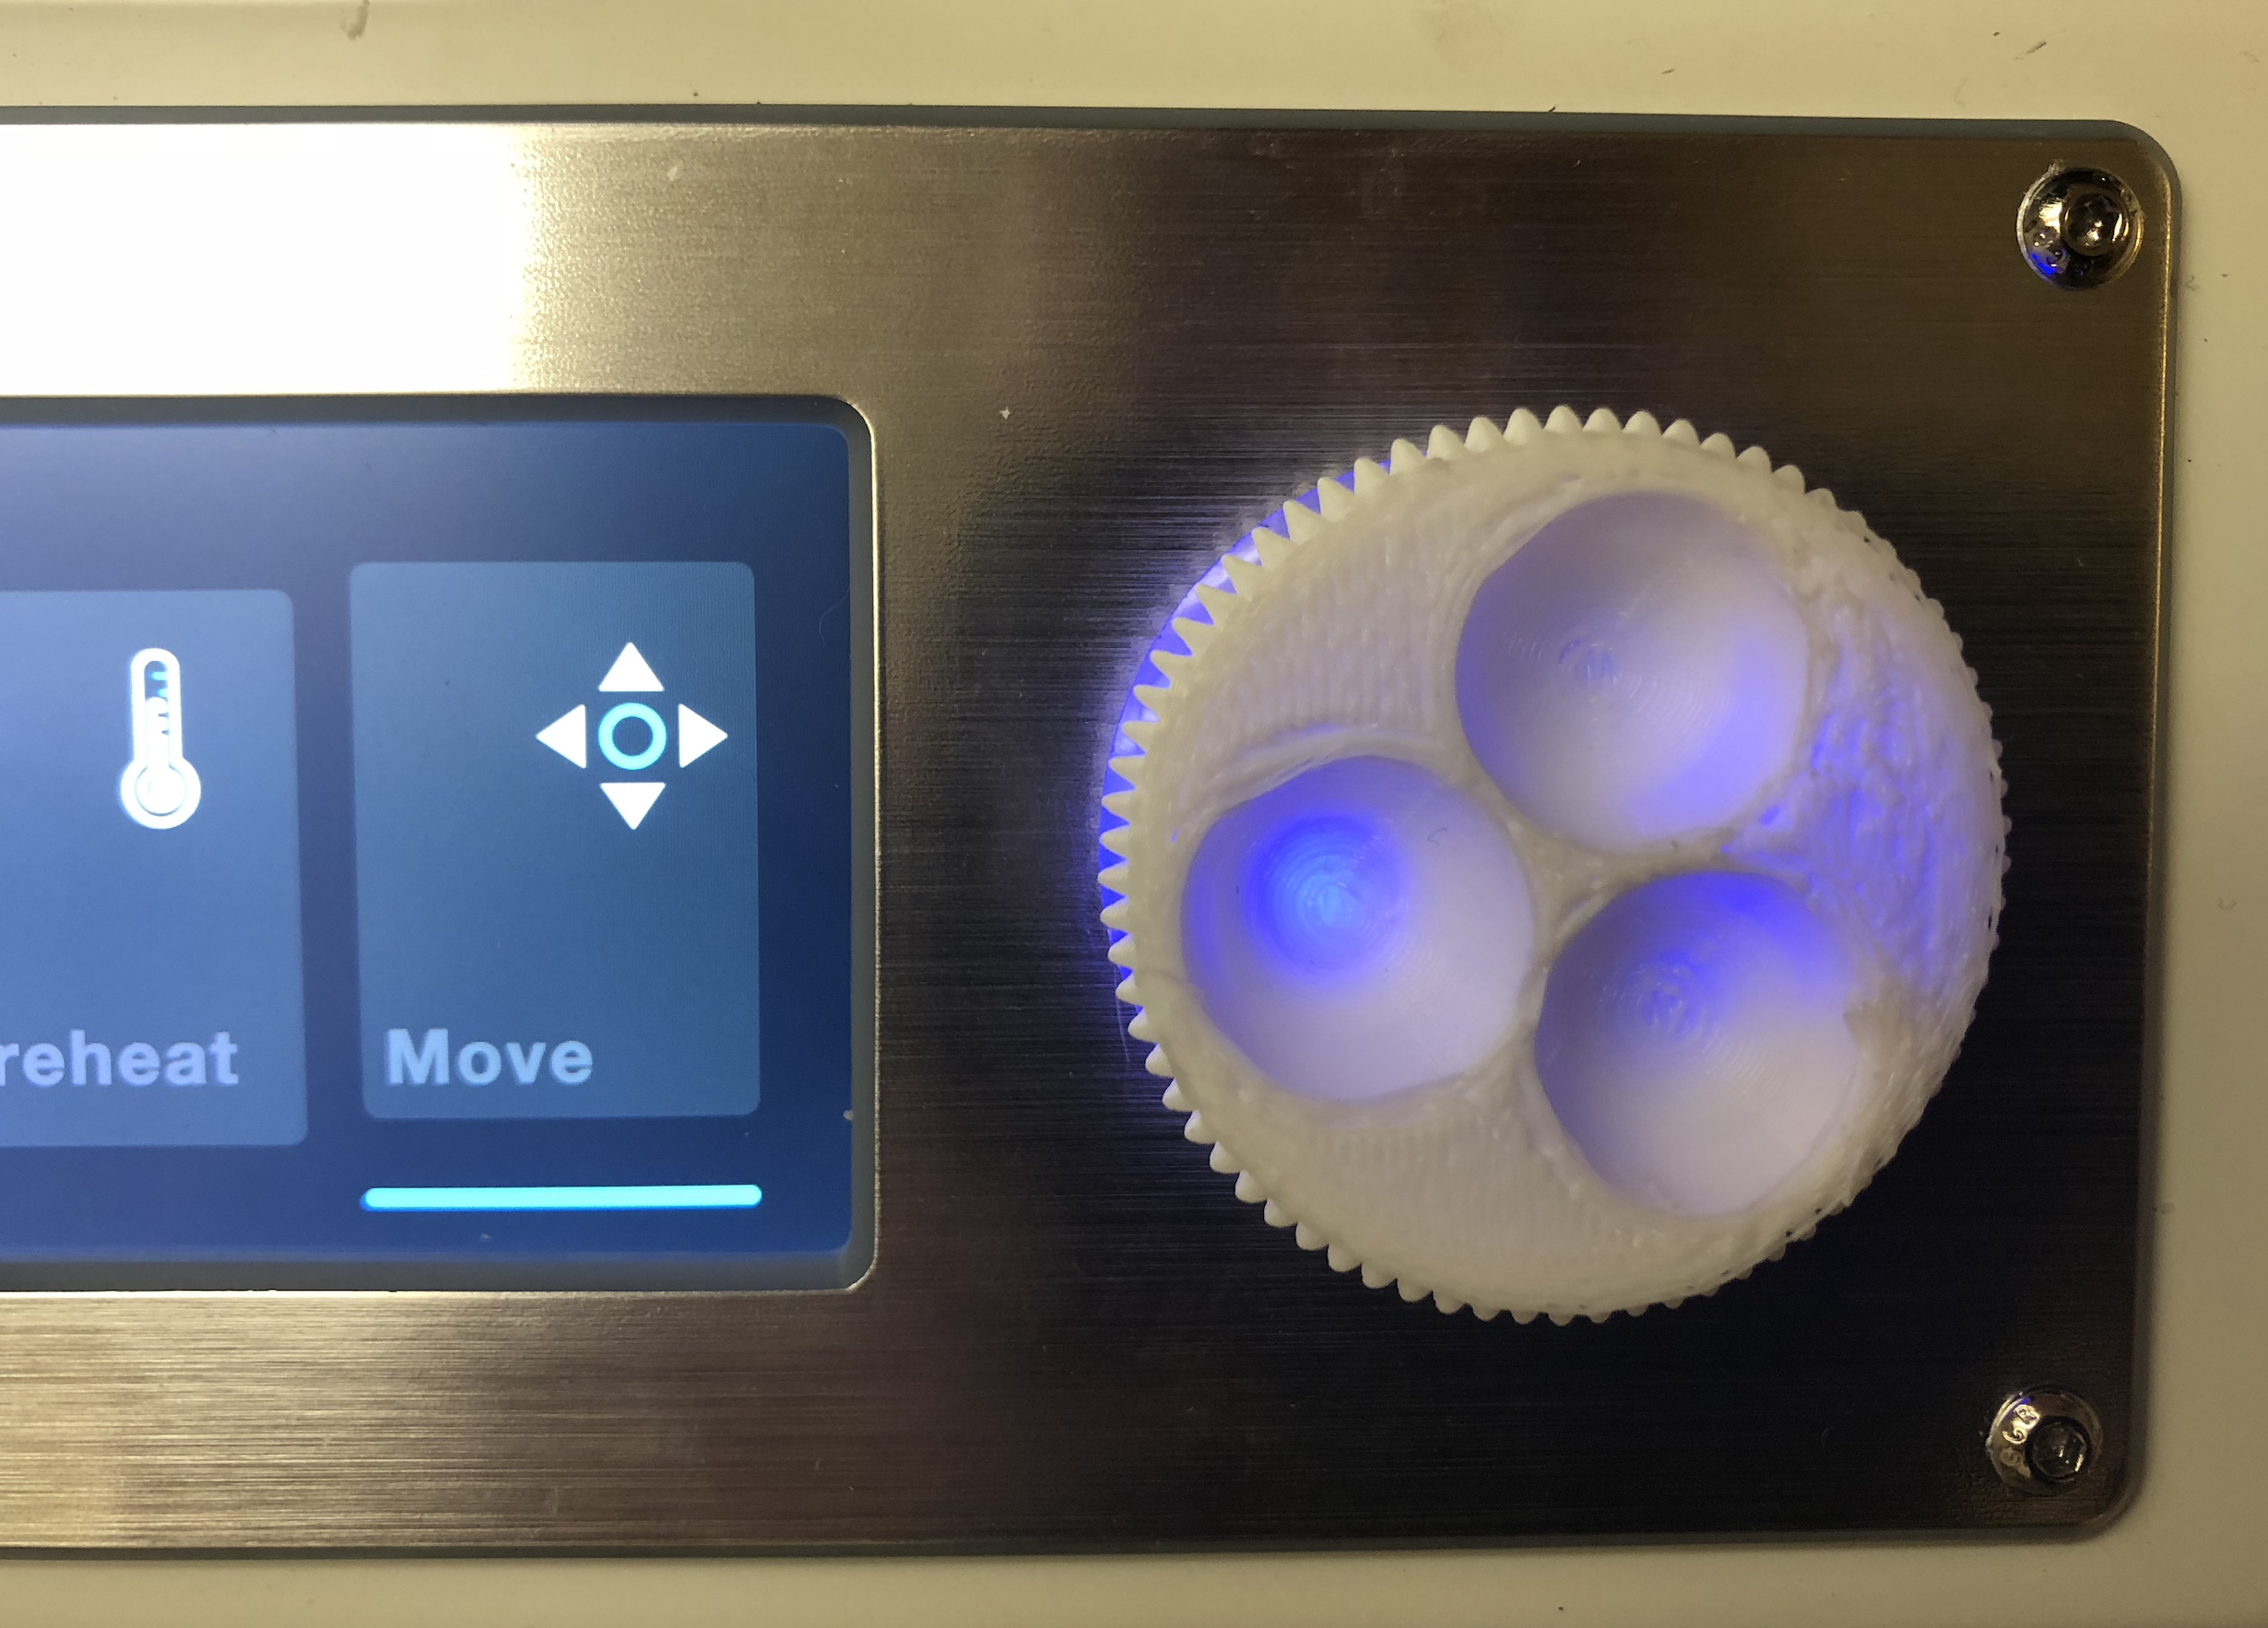
Since the front of the knob was the bottom of the print, and I was using the stock build surface, the front of the knob has a rough surface. Not the best looking knob in the world. Maybe could be printed upside-down, or on a better surface, or post-print finished. But despite appearances, this knob works quite well, I already like it better than the old knob. It is easier to grip with the serrated edges and the bowling-ball holes. You can also still see the LEDs behind it, and press the button to select. One downside is this replaces the old knob, there are designs to augment your existing knob, but for now I replaced it and tossed the old knob aside.
This gives me an idea, could also print knobs for potentiometers or variable autotransformers in electronics projects.
Fan guard
| Model | 30mm Minimal Fan Guard: MP Select Mini by numanair, published Aug 25, 2016 |
|---|---|
| Estimated print time | 0:45 |
| Actual print time | 0:53, 8 minutes slower (18%) |
| Estimated filament length | 0.77m |
| Estimated filament mass | 2g |
| Filament used | AIO Robotics AIOWHITE PLA, $11.99/500 g |
| Estimated cost | $0.05 |
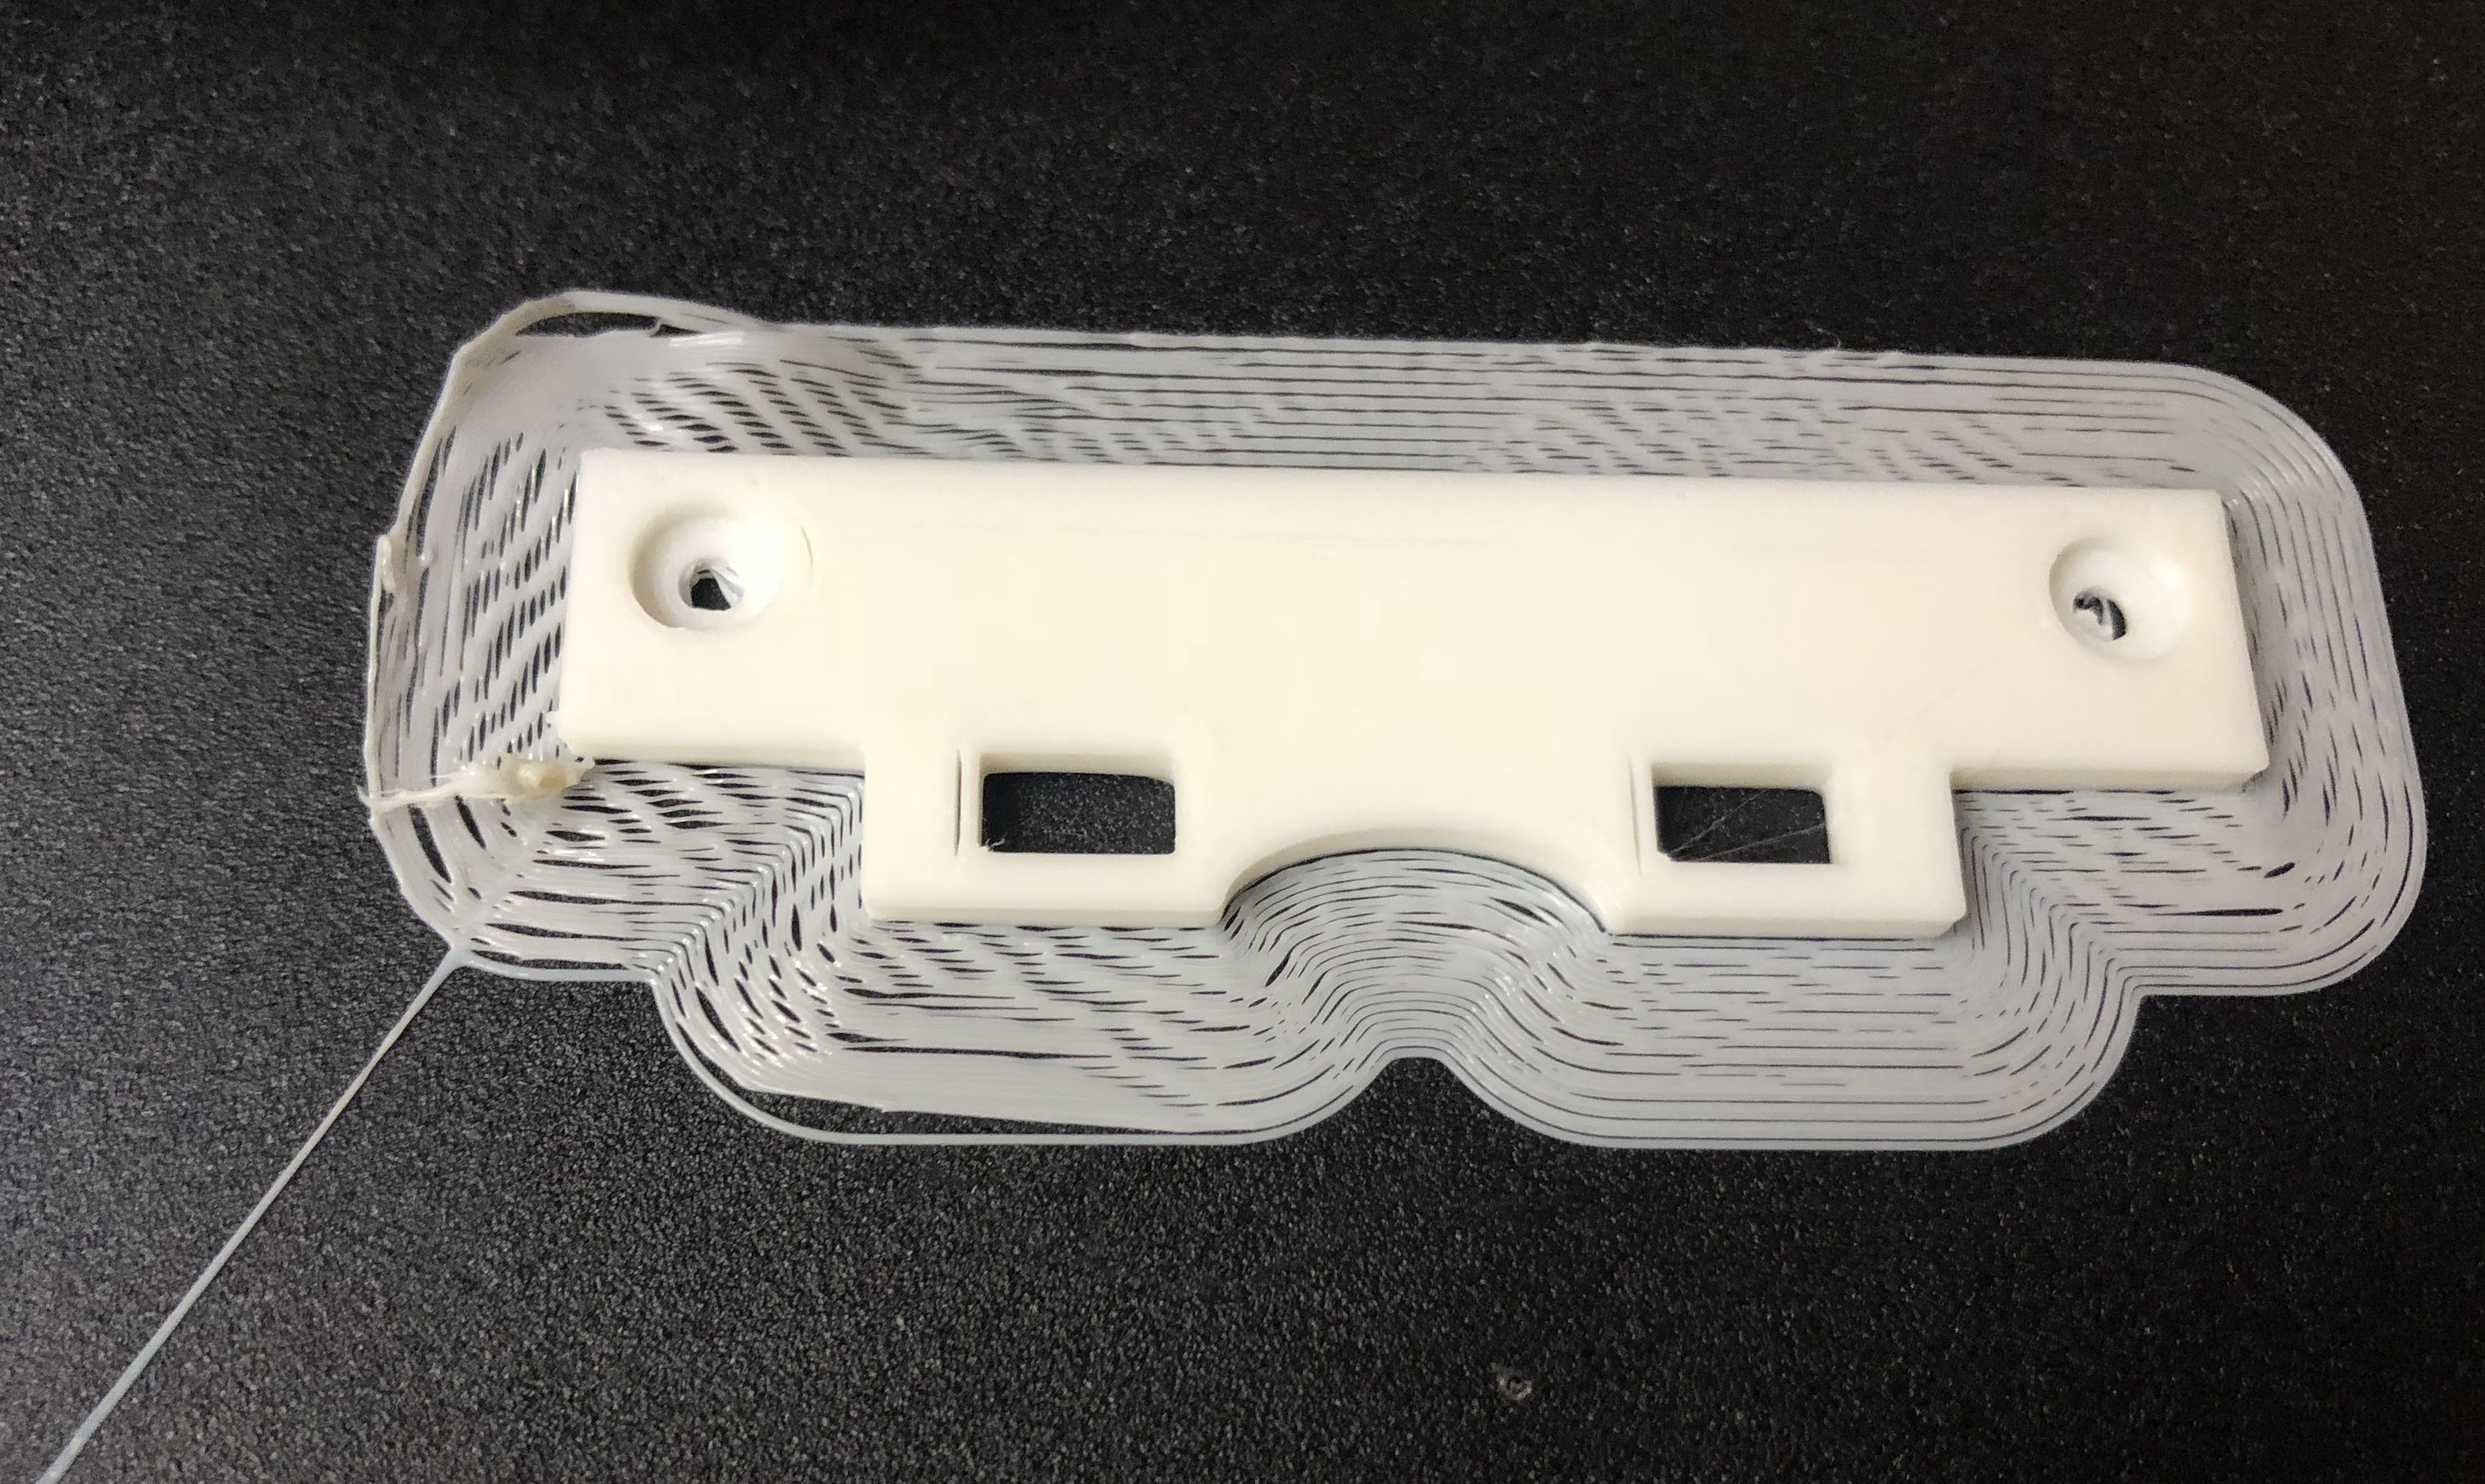
A small safety modification: fan grills, covering the exposed fan near the hotend. There are two basic types, snap-on covers or those that require unscrewing the fan screws, I opted for the latter, a minimal grill the designer describes as “roughly based on the printer’s design language while still allowing maximum airflow”. Included in the download are two models, the original is 30mm_minimal_fan_guard.stl and then after feedback about the grill hitting the fan, the author added fan_guard_slots_06_standoffs.stl.stl.
Import into Cura, rotate so it lies flat. The standoffs were facing up, but to get a cleaner print for the user-facing side, I wanted them to face downwards on the bed. Rotate then add a raft and supports. This will take more material, but I think (hope) it’ll give a better result:

Started out with printing a very nice raft, no problems there:

and before I knew it, the fan grill finished printing:

Gently separate the grill from the raft:

There is a lot of stringiness going on in the grill, cut it away with a knife. But while installing the grill into the fan, ran into a problem: the screws were too short. Cut away some of the layers of the standoffs, carefully. After doing so, was able to install the grill. Before:

After, the fan grill installed:

Powered on, preheated and homed, the fan turned on and did not rub against the grill, so there is sufficient clearance, cool.
Extruder level arm
| Model | MP Select Mini Bolt-able Extruder Lever Arm by ripcurl777, published Oct 7, 2016 |
|---|---|
| Estimated print time | 0:53 |
| Actual print time | 0:58, 5 minutes slower (9%) |
| Estimated filament length | 1.84m |
| Estimated filament mass | 5g |
| Filament used | AIO Robotics AIOWHITE PLA, $11.99/500 g |
| Estimated cost | $0.12 |
The somewhat alarmist This is your Daily reminder to PRINT REPLACEMENT PARTS WHILE THE PRINTER HAS NOTHING WRONG WITH IT!!! thread has some good tips on what to print early on. Wasn’t sure which of these parts I’ll actually need but the having a spare extruder arm seems like a good idea. Sliced with infill density 100%, layer height 0.2mm, brim, print completed:

Since the stock extruder arm still works I didn’t replace it with this printed part, but here it is alongside for comparison:

Stashed it away as a replacement. Who knows, maybe I’ll desparately need it some day and be thankful I printed this now.
Filament guide
| Model | Monoprice Select Mini Filament Guide with extra support by ekopapers, published Sep 6, 2017 |
|---|---|
| Estimated print time | 0:32 |
| Actual print time | 0:40, 8 minutes slower (25%) |
| Estimated filament length | 1.16m |
| Estimated filament mass | 3g |
| Filament used | AIO Robotics AIOWHITE PLA, $11.99/500 g |
| Estimated cost | $0.07 |
Found from /r/MPSelectMiniOwners: First 3 days with my first 3D printer!. Sliced with layer height 0.2mm, infill 30%, no build plate adhension. Printed it on the righthand side of my bed because that’s where I seem to get the best results:

Even without any build plate adhension options (no raft, no brim, no skirt, etc.), it printed relatively well, although there are some mysterious brown spots not sure what to make of those:

Good enough for a functional part. This is where it will be inserted, attached through the screw in the corner:

Retract the filament using the home screen move menu, then press the latch and pull it out. Unscrew the corner screw and thread through the filament guide hole, then screw in, and thread the filament through the guide. The part inside the guide moves freely, but it was printed all in one piece (amazing). The installed guide:

Now you can see the filament isn’t fed from the spool at such an aggressive angle. Not that I have had any issues with in this department yet, but better to proactively make the upgrade to reduce the likelihood of problems, especially since it is so cheap. Performed a print with this guide installed, worked great.
I also tried to print a spool holder, but failed and I ditched this effort for now. Notes below:
The stock spool holder spools the filament at an awkward angle, instead of directly feeding into the extruder. Fugatech 3D Printing recommended several improvements, including adding a new spool rack for better filament feeding: Modding the Monoprice Select Mini (Part 1). Two items on Thingiverse, the holder and an extension:
- Monoprice Select Mini spool holder by Toys, published Dec 31, 2016
- MPSM Spool Holder Extensionsby Geonovast, published Mar 21, 2017
Download the first one. Cura change layer height to 0.1 mm and infill density to 30%.
A problem I had was how to fit the model onto the building area? The .stl model comes oriented unusually. But with some rotations and moves, I placed the most flat part down. This is a serious print: Lside_spool.stl alone is estimated to take 5 hours 42 minutes to print. The designer said “rafts: no”, I printed with no build adhension, 0.1 mm layer height, but failed catastrophically:

I had a lot of trouble getting the pieces to fit into the bed. Rotate diagonally, but then raft can’t fit.
There is another design: Monoprice Select Mini Good Spec Spool Holder (larger Capacity) by 77-17, published Dec 21, 2017, found in the things for the Monoprice Select Mini Owners group, but the designer recommends printing with “PETG, or Tough-PLA”, which I don’t have. Guess I’ll be passing on this upgrade for now, we’ll see how well the filament guide by itself works.
Spinner topper for extruder
| Model | Gyro Spinner For MPSM (keyless) by TrunkFullaAmps, published May 7, 2017 |
|---|---|
| Estimated print time | 2:08 |
| Actual print time | 2:23, 15 minutes slower (12%) |
| Estimated filament length | 4.56m |
| Estimated filament mass | 13g |
| Filament used | AIO Robotics AIOWHITE PLA, $11.99/500 g |
| Estimated cost | $0.31 |
Although may seem frivolous, actually provides a functional purpose. The extruder movement can be difficult to see, so by adding this topper it provides a clearer visual indicator to help diagnose problems like I first had when setting up, of the extruder not pushing through the filament. Slice with layer height 0.175m, infill 20%, no supports.
The first layer came out poorly:

but apparently you can’t judge a print by its first layer, because somehow it recovered:

and finished beautifully:

The top piece although printed in one go is composed of concentric rings which rotate freely, and the bottom piece attaches to the extruder motor shaft. Specifically, it is going to go right here:

Took this opportunity to clean off the packing peanuts left there from shipment. Slide on the connector, then slide the tab from the gyro into it, it holds securely and spins when the extruder turns:

The large spinner is visible from afar, in another room, so I can quickly glance at it to check on it and confirm everything is alright. Good deal.
Kitchen
Now that the printer is modded and optimized, we can turn to practical prints for functional purposes. See /r/functionalprint for other ideas, and browse through Thingiverse popular. Among the most popular, number one at the time of this writing, is related to kitchen stuff.
Measuring cube
| Model | Measuring Cube by iomaa, published Dec 1, 2017 |
|---|---|
| Estimated print time | 10:12 |
| Actual print time | 10:50, 38 minutes slower (6%) |
| Estimated filament length | 25.59m |
| Estimated filament mass | 76g |
| Filament used | AIO Robotics AIOWHITE PLA, $11.99/500 g |
| Estimated cost | $1.82 |
An alternative to the clumsiness of measuring cups. First heard about this model from 3D Printing a Measuring Cube Kitchen Gadget + Thoughts on FDA Approved Filament and 3D Printing by 3D Printing Nerd.
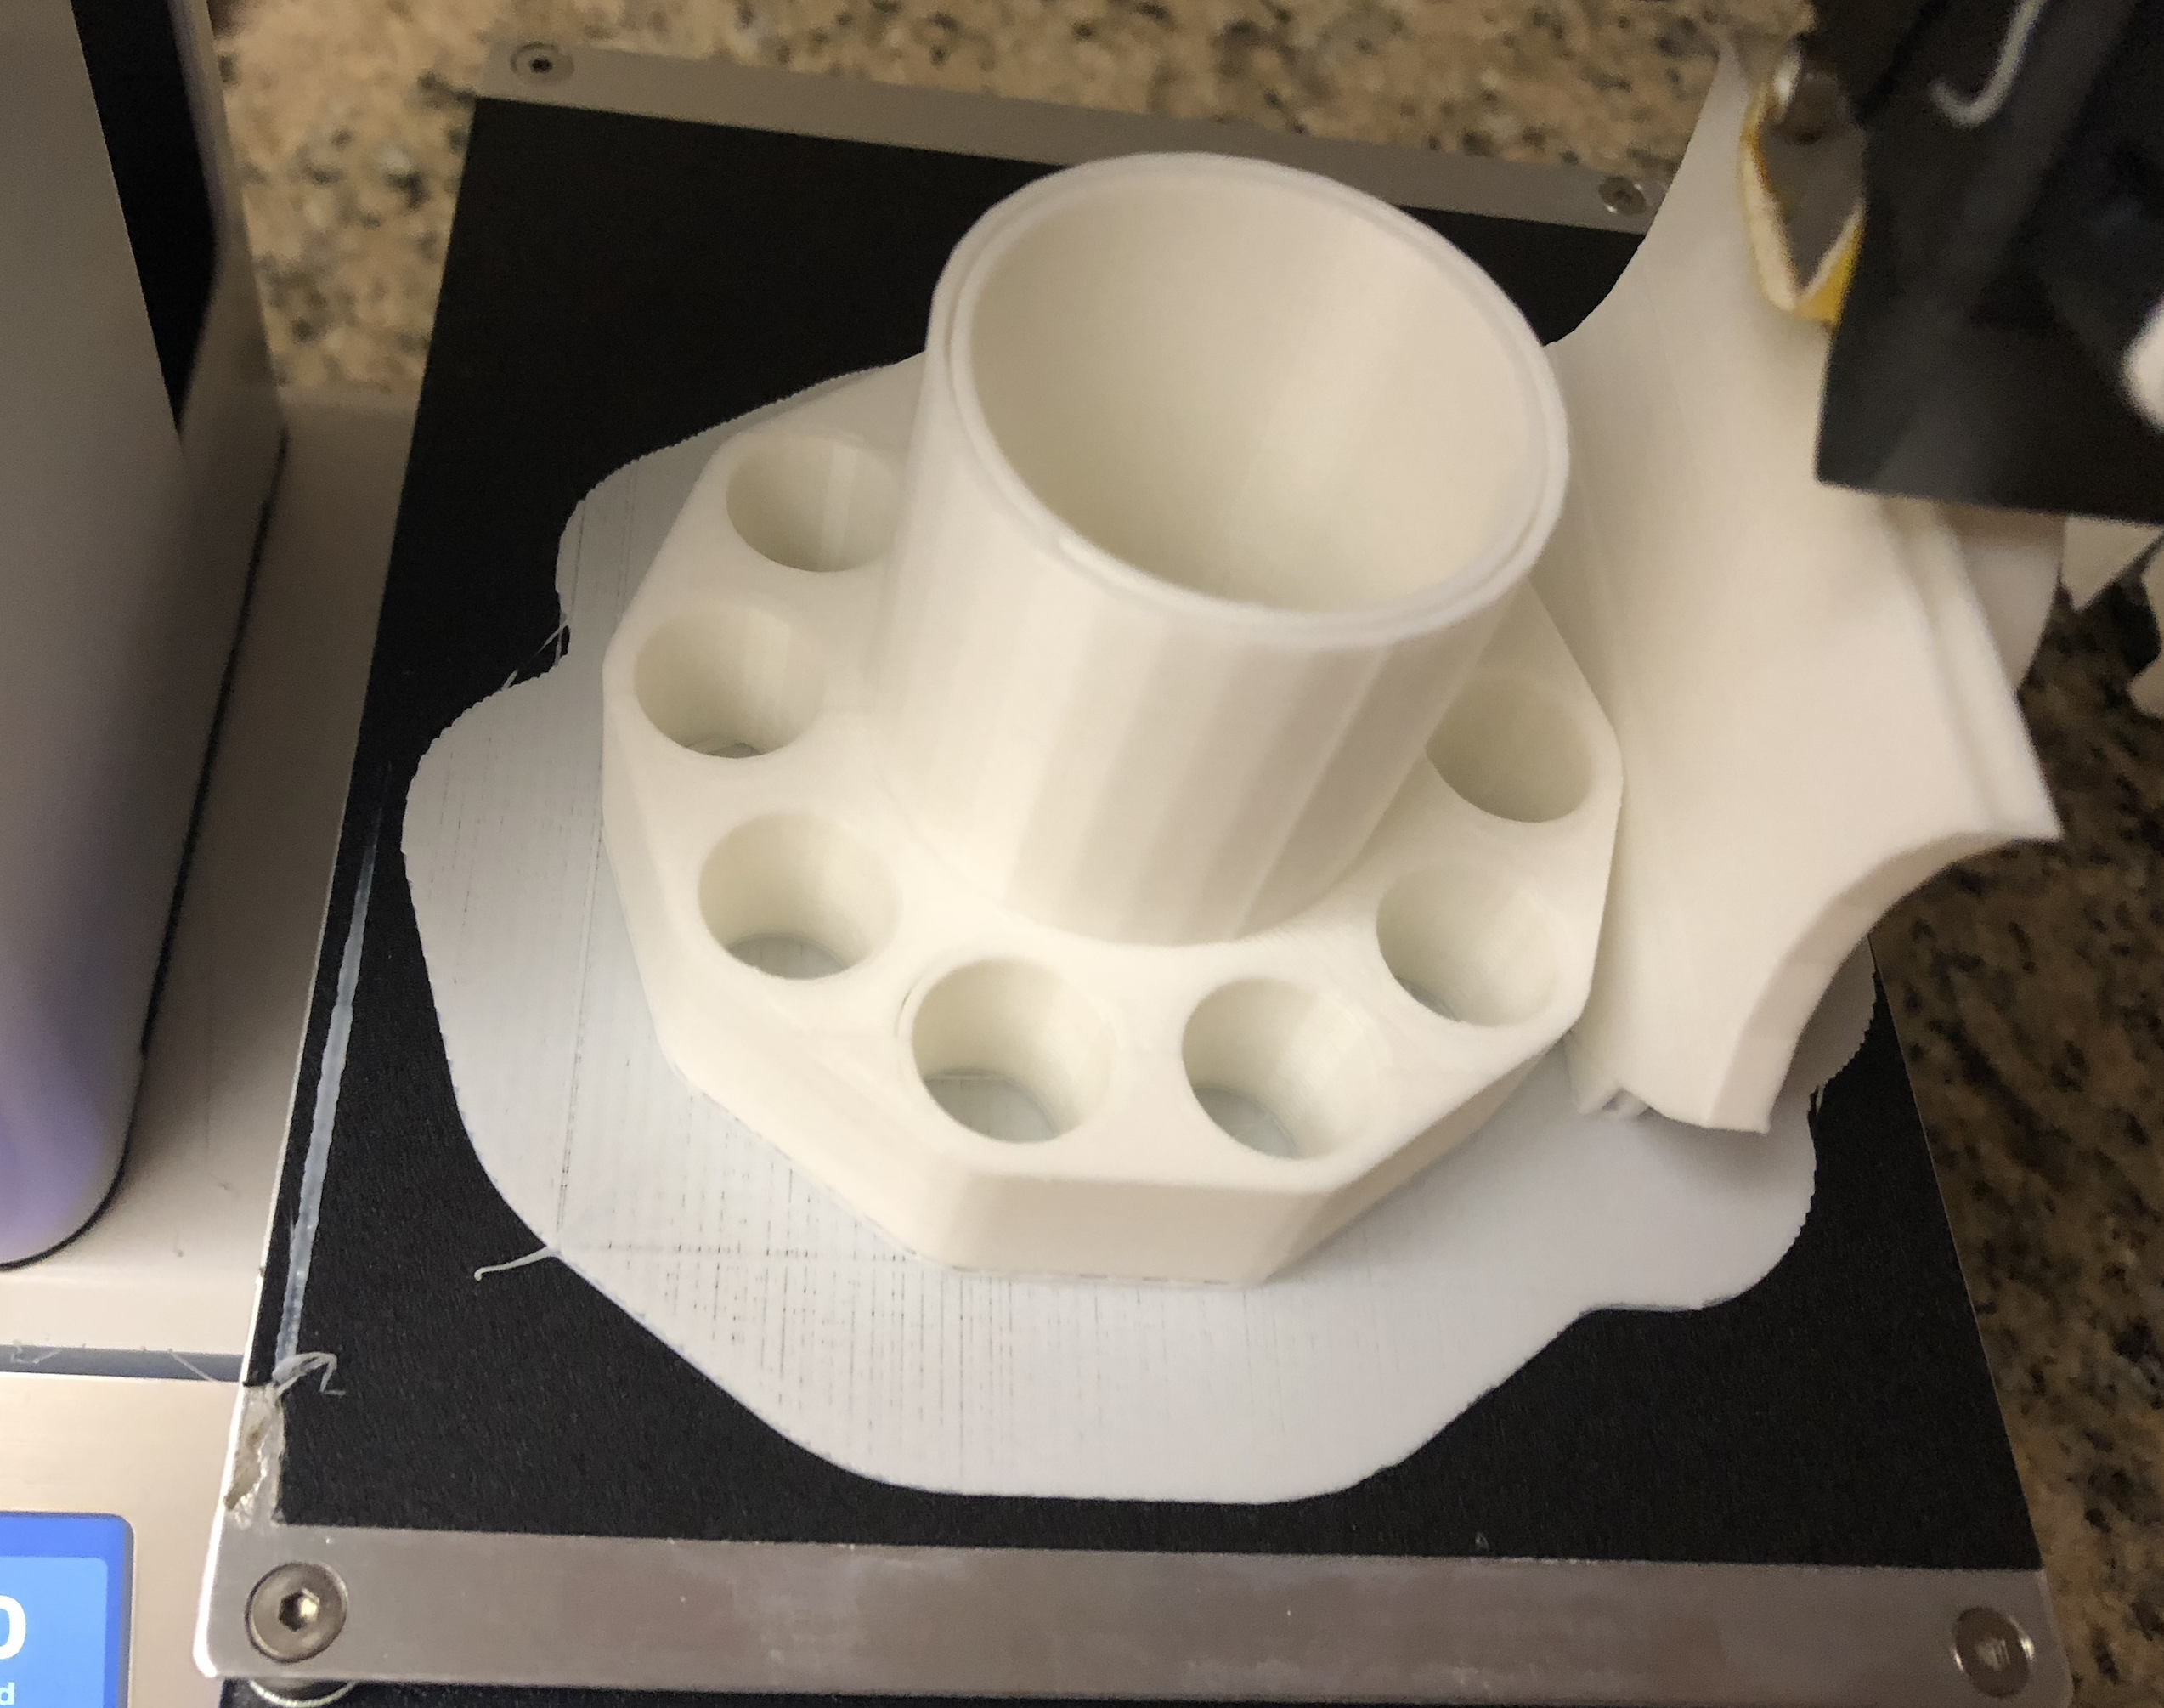
Load measuring_cube_version_2.STL into Cura. This is a big model, even reducing infill to 0%, no supports, increasing layer height to 0.2mm, estimated 15 hours 33 minutes, 39.5m / ~119g. That’s a large percentage of my available filament. Instead, load up the miniature version: miniCube.STL. It doesn’t have 1 cup, but has 1/2 cup and smaller. Only 10 hours 12 minutes, 25.59m / 76g, works out to $1.82 estimated cost of filament. I’ll take it. Slightly apprehensive about this print because I’m going to have to leave it overnight…but I did, and so far so good (a few hours to go):

At less than $2 of filament, this is less than the $9 + shipping to $12 + shipping (based on their survey) iomaa is planning to ask for. But how useful is volumetric measurement really? There is some discussion about legal vs customary cups, a 1.44% difference, as well as variations caused by packing density, all which can be avoided by weighing the ingredients instead. But the measuring cube looks cool and is easier to use, if less precise. The print completed almost 11 hours later:

Looks quite nice. The only imperfection is the bottom of the cube (not shown), probably due to my warping bed. To test it, how about making some rice? Measured slightly less than half cup (so you can see the label for this photo):

but I used a glass measuring cup to measure the water, due to concerns about water safety of PLA. Cook it up in a rice cooker, eat lunch. Yum:

Bag clip
| Model | Chip Bag Clip V7 by srwilson58, published Dec 19, 2015 |
|---|---|
| Estimated print time | 2:08 |
| Actual print time | 2:21, 13 minutes slower (10%) |
| Estimated filament length | 4.41m |
| Estimated filament mass | 13g |
| Filament used | AIO Robotics AIOWHITE PLA, $11.99/500 g |
| Estimated cost | $0.31 |
Says it is for bags of chips, but probably works with bags of other contents like salad. Slice with layer height 0.2mm, infill 100% (seems like a lot, but it asked for it, for the added strength I imagine), no build plate adhension options.
Is it worth 31¢ for a bag clip? Well, it is a different design but OXO Good Grips Bag Clip -2 Pack is $5.99/2 red (or $18.95/2 for white, geez), or $2.995 apiece, $0.31 is 90% cheaper.
Completed print:

The white PLA flexes when squeezing the clip, no issue. Successfully used to close a bag of salad:

Bathroom
Useful 3D prints: #1 Bathroom by Nikodem Bartnik has some cool applications. Maybe he’ll do more useful 3D prints, this is the first of what appears to be a series, published October 24th, 2017 but there isn’t a sequel yet, I look forward to it. Anyways, some useful bathroom things.
A neat set of towel hooks, soap dish, toilet paper holder, and toothbrush holder, all themed with dinosaurs: T-REX Remix Bathroom Set by Solstie, published May 12, 2014. But I’ll try simpler, unthemed models first.
Toothpaste squeezer
| Model | Toothpaste Tube Squeezer by ottenjr, published Nov 21, 2015 |
|---|---|
| Estimated print time | 2:56 |
| Actual print time | 3:17, 21 minutes slower (12%) |
| Estimated filament length | 6.50m |
| Estimated filament mass | 19g |
| Filament used | AIO Robotics AIOWHITE PLA, $11.99/500 g |
| Estimated cost | $0.46 |
There are two basic designs, the simpler one including Bartnik’s is just a small slot you push over the toothpaste tube to push out the paste, similar to this design: Simple Toothpaste Squeezer by ChatterComa, published Jun 6, 2015. But it leaves the empty part of the tube dangling out the end. A more sophisticated design rolls up the empty tube, out of the way.
I sliced it with a brim since I’ve had good results with build plate adhension options, but the designer didn’t say it was needed, better safe than sorry. The print completed no problem:

Comes in three parts. Scrape away the debris, separate from the brims, lay out the components:

To assemble, insert the pin into the tube then affix the cap on the end, it came together easily. Slide a toothpaste tube through both slots, in the holder and pin:

You can feel the paste being squeezed out, works well. But this squeezer has another feature, it can roll up the tube:

Nifty!
Toothbrush holder
| Model | toothbrush Holder by theTeV, published Feb 13, 2016 |
|---|---|
| Estimated print time | 3:37 |
| Actual print time | 3:58, 21 minutes slower (10%) |
| Estimated filament length | 8.60m |
| Estimated filament mass | 25g |
| Filament used | AIO Robotics AIOWHITE PLA, $11.99/500 g |
| Estimated cost | $0.60 |
The original: Quad Toothbrush Holder by by JMSchwartz11, published Mar 7, 2014. There are several remixes of this design, but the “more printable” variants are more square; I like the rounded corners of the original, if I can print it. Can I? Only one way to find out… load into Cura. Too big :(. Try theTeV’s 3-hole version, rotate on its side. It fits. Layer height 0.2mm, infill 20%, no build plate adhension. Completed print:

A wider base so it doesn’t fall over as easily would be nice, but it works:

Soap dish
| Model | Corner Soap Dish by hammerbot, published May 5, 2015 |
|---|---|
| Estimated print time | 6:10 (5:41 + 0:29) |
| Actual print time | 6:34 (5:59 + 0:35), 24 minutes slower (6%) |
| Estimated filament length | 16.11m (14.35m + 1.76m) |
| Estimated filament mass | 47g (42g + 5g) |
| Filament used | AIO Robotics AIOWHITE PLA, $11.99/500 g |
| Estimated cost | $1.13 |
Soap holder by piuLAB, published Jul 23, 2014, includes two pieces, detachable for cleaning. But 141.6 mm x 123.1 mm is beyond 120 mm x 120 mm of the Maker Select Mini v2. Too small. Bathroom Things by pegasocube, published Apr 24, 2017, includes another soap tray, more open, with a raised grill. Also wanted to make the Modular Shower Caddy by Borchei, published Jun 6, 2016, but it is just too big for the Monoprice Select Mini v2. One side is 184 mm, above the 120 mm bed.
Found a model that fits, the corner soap dish. This uses an interesting technique, the grate is created by setting shell top/bottom thickness to 0, then adding an infill, about 20% looks good. The grate should be very quick to print, only about a half hour. The full dish is more time-consuming, a good candidate for overnight printing. No infill but thick 1.2m walls with 0.2mm layer height. Started the full dish late at night, layed down a gorgeous first few layers:

finished a minute less than six hours later:

The grate soon after:

Fits the soap and into my shower corner decently well, although not as perfect fit of a custom design:

Electronics
Should 3D printers be used to print electronics project enclosures? The comments in Hacker News discussion: The Guide to Not Buying a 3D Printer have naysayers:
moron4hire 1241 days ago I’d also like to add: make sure you actually need a 3D print. Most of the stuff I see people printing could be made faster and more reliably with more traditional manufacturing methods. For example: a 3D printed case for just about anything is a terrible idea. It’s very hard to get square, true prints of specific dimensions. I’ve seen many a warped Raspberry Pi case.
but also success stories:
bri3d 1240 days ago What if I’m optimizing for cost, not speed and reliability? My printer works just fine while I’m away, so I don’t really care about a print taking an hour or two, and plastic is bendy and forgiving enough that a bit of accuracy sacrificed is fine. I’d argue that additive manufacturing via hobbyist FDM printing is a lot cheaper for one off designs than subtractive manufacturing of any form, because the consumable cost is limited to utilized filament and a tiny amount of printer maintenance rather than huge amounts of waste combined with expensive, finicky tool bits and the same kinds of maintenance. I do agree that for items like a Raspberry Pi case which could be mass-produced via molding to much better tolerance at a low cost, 3D printing might be silly, but for truly one-off, low accuracy consumer parts I don’t think 3D printing can be beat. I personally have also not had much problem getting square, true, dimensionally accurate prints with a crappy printer (Solidoodle 2). The most deflection I’ve ever seen is about .8mm across the 150x150mm build area. That isn’t perfect and obviously won’t work for precision equipment, but combined with ABS’s flexibility and forgiving nature it’s certainly good enough to make one-off enclosures, fasteners, buttons and knobs, adapters, and other “glue” parts, which is most of my use for 3D printing. I will say that 3D printers are hard to set up, and that’s probably the source of a lot of the warped cases you’ve seen. CNC mills and lathes are just as hard to set up, though - you’ve just generally paid the vendor tons of money to do it for you.
How about in practice, in reality? As John Salvatier acutely pointed out, Reality has a surprising amount of detail (see also discussion). Maybe you can get away with purchasing commonly-sized enclosures and fitting your electronics into it. But I purchased this case: New ABS DIY Plastic Electronic Project Box Enclosure Instrument 100x60x25mm VE834 P, $1 from Aliexpress, and have yet to find a suitable circuit board for it. Would need to cut the boards to make fit or design specifically for it. How about instead designing the case to fit the board? At $1 we have about 42 grams of filament (or more) to work with, that’s a lot to be cost-competitive.
STM32 blue pill case for Black Magic Probe
| Model | STM32 blue pill case (blackmagic programmer) by thmjpr, published Sep 2, 2017 |
|---|---|
| Estimated print time | 1:54 |
| Actual print time | 2:10, 16 minutes slower (14%) |
| Estimated filament length | 3.92m |
| Estimated filament mass | 11g |
| Filament used | AIO Robotics AIOWHITE PLA, $11.99/500 g |
| Estimated cost | $0.26 |
There is another Bluepill case by BogdanKecman, published Jul 31, 2017, but it is only the bottom. Cover the various STM32-based projects. For the first one, since it is most complete, would like to make a case for:
Drag both of the files bmagic_case_bottom.STL and bmagic_case_top.STL into Cura, position on the printing area. The designer used a 100% infill but I’m trying 0%, layer height 0.2mm. Finished printing:

There are some imperfections I had to carve away, but a bare STM32 blue pill board fits in:

luckily I had just received two new blue pill development boards, and didn’t solder the headers on this one yet. But before we go any further, best to flash the blue pill with the Black Magic Probe firmware (following the classic instructions Converting an STM32F103 board to a Black Magic Probe from Param Aggarwal) before sealing up the case:

attempting to flash with another Black Magic Probe, and I also attempted with a USB-to-serial adapter, but both kept failing with:
__main__.CmdException: NACK 0x43
stm32duino forums: Can’t initiate chip erase indicates this means the chip is locked, and needs to be unlocked and erased, such as by using the STM32 Flash loader demonstrator (UM0462). Well, flash_loader_demo_v2.8.0.exe is Windows-only, and stm32loader.py doesn’t support seem to unlocking. Running stm32flasher.py in verbose mode (-V) shows the commands it supports:
*** Get command
    Bootloader version: 0x22
    Available commands: 0x0, 0x1, 0x2, 0x11, 0x21, 0x31, 0x43, 0x63, 0x73, 0x82, 0x92
Bootloader version 22
*** GetID command
Chip id: 0x410 (STM32 Medium-density)
Traceback (most recent call last):
  File "/usr/local/bin/stm32loader.py", line 451, in <module>
    cmd.cmdEraseMemory()
  File "/usr/local/bin/stm32loader.py", line 212, in cmdEraseMemory
    if self.cmdGeneric(0x43):
  File "/usr/local/bin/stm32loader.py", line 115, in cmdGeneric
    return self._wait_for_ask(hex(cmd))
  File "/usr/local/bin/stm32loader.py", line 88, in _wait_for_ask
    raise CmdException("NACK "+info)
__main__.CmdException: NACK 0x43
From looking at the source, these commands are implemented by these functions in stm32loader:
| Command | Function |
|---|---|
| 0x00 | cmdGet |
| 0x01 | cmdGetVersion |
| 0x02 | cmdGetID |
| 0x11 | cmdReadMemory |
| 0x21 | cmdGo |
| 0x31 | cmdWriteMemory |
| 0x43 | cmdEraseMemory |
| 0x63 | cmdWriteProtect |
| 0x73 | cmdWriteUnprotect |
| 0x82 | cmdReadoutProtect |
| 0x92 | cmdReadoutUnprotect |
Unprotect…that sounds a lot like unlock, is it the same thing? Nothing calls these functions, but there is commented-out code which could:
        mdebug(0, "Chip id: 0x%x (%s)" % (id, chip_ids.get(id, "Unknown")))
#    cmd.cmdGetVersion()
#    cmd.cmdGetID()
#    cmd.cmdReadoutUnprotect()
#    cmd.cmdWriteUnprotect()
#    cmd.cmdWriteProtect([0, 1])
Uncomment cmdReadoutUnprotect and then cmdWriteUnprotect. Execute and both seem to fail with a timeout, but then after rebooting and rerunning erase, I can write to the chip! Shows up as Black Magic Probe in firmware update mode, then run dfu-util as usual, and the firmware is all set: two new device nodes in /dev, cu.usbmodemDFE17CC3 and cu.usbmodemDFE17CC1. Back to making the case.
There are two ports on this case, 3-pin and 2x3-pin. What pinouts to use? Couldn’t find any, and the official JTAG SWD 10pin IDC Cable is 10-pin, nor the 1bitsquared 1b2-adapter-collection/bmp_4pin_50mil_swd connector, so I just picked my own pins. For the 3-pin port, use it as the serial port, bridged to the virtual USB serial port (/dev/cu.usbmodemDFE17CC3 on my system):
- 1 (black): GND
- 2 (yellow): RXD (A3)
- 3 (blue): TXD (A2)
Push wires through the plastic tabs (may require some cutting, I used a small flat-head screwdriver to push the wire) then solder onto the other end of a 100 mil header. Used the yellow 0.1” headers included with the blue pill, broke off a few pieces, since they are not needed for the board itself. Getting the hang of it:

For the double header, which is for JTAG/SWD, most important are the SWD pins so placed those first, but also the additional JTAG pins if needed. Top header wires, away from the USB port side, all you need for Serial Wire Debug:
- 1 (black): GND
- 2 (green): SWDIO/TMS (B14)
- 3 (white): SWCLK/TCK (A5)

On the other side, additional pins for JTAG, serial wire output, and power:
- 1 (red). 3.3V
- 2 (green): TDI (A7)
- 3 (red): SWO/TDO (A6)

Before closing, tested with another serial adapter connected to this device’s serial port. Worked perfectly, the data was transmitted/received, and the red power LED shines through the PLA plastic:

Fold it up. This is a snap-in case, so the two pieces should fit together. However, the debug port right-angle header stuck out too far. I tried to desolder it but hit an adjacent capacitor, so instead, cut off the ends so it fits. Nearly seamless:

Plug it in and power it up:

Cool. Looks nice, yet compact. One problem: no labels. For a later version, would be nice to include labels raised or recessed on the case. But until then, I affixed general-purpose sticky labels and wrote on them with a pen, labeling this device “Black Magic Probe - UART, SWD/JTAG” and the pin outs.
How well does it work in practice? Here I am flashing pill_6502: 8-bit 6502 CPU and 6850 ACIA emulation on the STM32 blue pill to run Microsoft BASIC from 1977 onto a new blue pill board (had to un-write-protect this flash too) using this blue pill-based Black Magic Probe with 3D printed case:

This elegant construction replaces the mess of wires on a breadboarded blue pill you may have seen in previous blog posts, this printed case is definitely a win. I can also see using variations of it for other blue pill related projects.
Solder spool stand
| Model | Solder Spool Stand Improved by AndrewBCN, published Nov 25, 2014 |
|---|---|
| Estimated print time | 3:03 |
| Actual print time | 3:26, 23 minutes slower (13%) |
| Estimated filament length | 6.37m |
| Estimated filament mass | 18g |
| Filament used | AIO Robotics AIOWHITE PLA, $11.99/500 g |
| Estimated cost | $0.43 |
Not too much to say about this one, it is an object to hold your spool of solder. Completed print:

Two pieces: the spindle and stand itself. Thread the spindle through the solder spool (removing any labels that block the passage), then lay it on the stand. No snapping in, it rests inside. To help guide the solder, take a thick wire, bend it into a small coil, then stick into the hole into the base. Heat it up with a the soldering iron then press to insert it into the plastic. Then you can thread the solder itself through, and pull it whenever you need solder:

The spool doesn’t roll too smoothly, I think I’d prefer a round spindle instead of rectangular, but it’ll do. Also would be nice to have a stand for solder wick, maybe even a combined stand, but since that is used less, a solder spool stand is at least useful for now.
Soldering fingers
| Model | Soldering Fingers by mistertech, published Aug 19, 2016 |
|---|---|
| Estimated print time | 2:11 |
| Actual print time | 2:26, 15 minutes slower (11%) |
| Estimated filament length | 7.59m |
| Estimated filament mass | 22g |
| Filament used | AIO Robotics AIOWHITE PLA, $11.99/500 g |
| Estimated cost | $0.53 |
For holding wires together when soldering or heatshrinking. 0.3mm layer height, 20% infill. Printed:

The base was very solid, you could hear the extruder extruding what sounded excessive, but I’m happy with the result, it is fairly sturdy. The most consistent solid base I have printed yet:

Does it work? Tested soldering two small white wires:

The fingers grip the wires well. Used it conjunction with the solder spool made previously, a killer combination.
Tool carousel for small tools
| Model | Tool Carousel for small tools by mbeyerle116, published Feb 28, 2015 |
|---|---|
| Estimated print time | 9:17 |
| Actual print time | 10:04, 47 minutes slower (8%) |
| Estimated filament length | 23.38m |
| Estimated filament mass | 69g |
| Filament used | AIO Robotics AIOWHITE PLA, $11.99/500 g |
| Estimated cost | $1.65 |
Layer height 0.2mm, 0% infill. Rotate to fit both on the bed. Raft, and supports because I rotated the base vertically to fit:

The raft printed beautifully uniform, no problems with adhension:

A long, overnight print, but it is shaping up:
Finally completed. Took some care to remove from the bed. The raft looks as nice coming out as it did going in:

but the downside is a fair amount of sacrifical pieces that have to be broken away, including supports (which again may have not been strictly necessary but I wanted to be sure with the smaller print area and how I rotated the parts):

There was moderate stringiness around the tool holes, but nothing a knife can’t fix. The top wasn’t as smooth as I would have liked (supposedly, glass beds would be good for improving this), which I was first annoyed with, but then realized when occupied the tools mostly cover these imperfections up (although sanding it down wouldn’t be a bad idea later). Fully stocked with tools:

Screwdrivers, tweezers, pliers, side cutters, marker, brush, wire strippers. Meant for smaller tools, but slightly larger tools like those bigger screwdrivers seem to fit fine, downwards. The very small eyeglass screwdrivers don’t hold too well, some kind of indentation in the base to catch the end would be nice for a future revision. The larger middle hole is good for bigger tools, albeit only one. But all in all, this tool carousel is a great space saver and organizer for my workspace, spacious and stable. Another shot, top down, with all the tools I could fit:

Summary & conclusion
| Total models printed (15) |
|
|---|---|
| Total actual print time | 53:27, about 74% utilization over 72:00 |
| Total estimated filament mass | 339g, about 68% of the 500g roll |

Got the printer late in the week, set it up, then started printing nearly non-stop from Friday throughout the weekend, until publishing this blog post on Monday. Estimating 3 days = 72 hours, this means the printer was in use almost 75% of the time, since my total print lengths summed to 53 hours, 27 minutes. Strictly more than the 48 hours composing the weekend but I think we all can agree this was a productive few days. More than half of the 500g filament spool was used, summing to 339g not including failed or test prints.
All in all I made 15 useful objects. Not bad for my first experience with 3D printing, I’d say. Overall I’m very satisified with the Monoprice Select Mini v2 and agree with the chorus of opinions on various forums it is an excellent beginner starter 3D printer. About the only limitation I occasionally ran into was its limited print bed size (although there are MPSelectMini wiki: Mods & Improvements that can be made to expand the bed size, and also these more advanced mods which I didn’t try: Let’s Print 3D: Essential Mods to Upgrade Your 3D Printer (Maker Select v2), so I couldn’t print everything I wanted, but this problem rarely came up. Most useful objects you can print fit within the limited 120 mm dimensions.
The AIOWHITE filament was also superb, although pricey. I may try other midrange brands once/if I run out of this spool. By my estimates I have only 161g remaining, but I haven’t actually weighed the spool before and after to get an accurate measurement (note to self: next time, weigh immediately). The estimates from the Cura slicing program were consistently lower than the actual print times, from 1 minute to 47 minutes depending on the total length, or from 1% to 25% (both very short prints), an arithmetic average underestimate of 11.3%. Keep this in mind when scheduling print jobs in the future. Real-time print length estimation and scheduling would be nice, alas, the Monoprice Select Mini v2 only shows you the actual print time when it completes, and only has an unlabeled progress bar during printing.
Long story short, the MP Select Mini v2 provided a perfect introduction to 3D printing. There are lower-end and higher-end printers but I’ll probably stay with the MPSM for a while, until I outgrow it. Even with this limited machine, thanks to the vast universe of models designed and published by modelers from around the world on Thingiverse and elsewhere, tons of everyday useful items (and specialized niche items) can be readily available at your fingertips, manufactured conveniently at your home. And I haven’t even scratched the surface of the true power of 3D printing: designing and printing your own custom models.